30 years as a gear whore / kit slut

When I first thought of making a list with all the stuff I have used throughout my time, I’m not quite sure I had an idea, just how encompassing it would be. I at first dropped the idea of having pictures, since it would have taken several hours to find the pics and digitize them. Edit: I have now found pics of most of the gear. Many of the pictures are mine, others found via a search on the interwebz, when I couldn’t find one in my own archive.

So here it is.

There is, with guarantee a few items I have forgotten to include or don’t remember the maker of, so left them off the list. But overall the list is correct, also in the timeline.

If it says “Issued and a year”, that is when I was issued it in the Army. Not when it was brought into service in the Army, there might be some discrepancies between those as some units were issued items at different times.

“Issued PSC 2005” means I was issued it while working for a Private Security Company and which year.

If it says “Purchased and year”, that is when I have privately purchased it.

I have decided to just give some general comments and not full reviews on each item as that would have taken ages to finish.

Category:

Belt mounted systems, complete with belts, harness, pouches:

A belt mounted system, often called a beltkit, is a system where the majority of the weight is carried by the hips. The harness is there to add stability to the belt, not as a primary means of load carriage.

So what have I used:

US M1956 load carrying equipment (Purchased 1985)

Used while I was still in the boyscouts (Our scout troop looked more like a militia unit, but with blue shirts and scarfs.

Canvas shrinks, when wet. H-Harness good for stability. Buttpack was nice. Alice clips gives chaffing wounds.


US Alice gear load carrying equipment (Purchased 1986) Upgraded my scout loadout, but kept it and used it when I joined the army in 1989. Nylon doesn’t shrink when wet. decent waterproofing, Y-suspenders (H-suspenders shown) = unstable belt when carrying a rucksack and the belt is lowered beneath it. Alice clips still give chaffing wounds.


Danish Army M/45 load carrying equipment (Issued 1989)

The worlds worst load carrying setup. Canvas webbing still shrinks when wet, X-harness, Magpouches from hell, canteen cap leaked. The F1 sustainment pouch same as the WWII British version, the F2 sustainment pouch/backpack upgraded with a nylon tarp version. Really funny to think back and realize that authorities thought, that this was an ok system and saw fit to ban the use of privately purchased gear, because if it was issued, it was good enough.


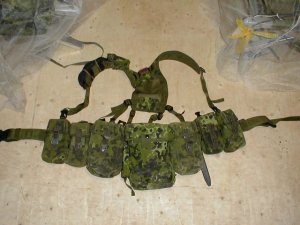
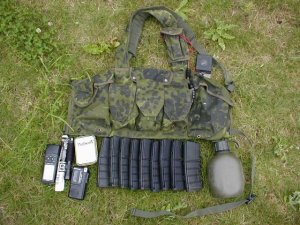
Arktis beltkit (Purchased 1993-94)

A very light and complete system. Most stable harness/yoke I had experienced so far. Nice padded belt. Decently designed pouches. Single layer construction, not as durable as the UK PLCE, but I did not have anything that broke, except for a corner on the bottom of a magpouch, that wore through.


M/96 beltkit, a Danish version of the UK PLCE. (Issued 1996)

Solid construction, good harness/yoke. The bottom corner part of the pouches tend to curl inwards towards the body and this leads to chaffing on the body, bum cheeks and upper thighs when carrying a rucksack on top for longer distances. A hip pad purchase is advised.

In spite of this, it is probably still the best designed complete belt based load carrying equipment I have used so far. There are newer designed systems on the market, that addresses some of the issues, but I have not had hands-on on these systems.


Category:

Loadbearing vests:

Why use a loadbearing vest instead of a belt kit?

Vests provide better comfort, when most of your time is spent in vehicles, since the back is usually free, which means better comfort in seats. They also work better with a long back rucksack, than a belt kit. Vests can have the same load bearing capacity as a belt, just spread out across the body instead of the waistline.

In my opinion, the loadbearing vest was outdated in the Danish Army in 2004, where it basically became the norm to use bodyarmor, all the time.

The Army proceeded though to design and issue a load bearing vest named M/05 which was adjustable enough to wear over your bodyarmor, however this layer upon layer of items couple with a very large bodyarmor, meant your volume was significantly larger, which is not good.

So what have I used:

UK CQC 95 Pattern Combat vest (Standard UK vest) (Purchased ~1995-1996) Magazine pouches with fastex buckles, not optimal. Small sized compared to the CQC DASOF vest issued to Danish Army Special Operations Forces. Not the optimal layout of pouches for me.


CQC Trial vest for the Danish Army (Purchased 1996-97)

Very much like the UK 95 Pattern Combat vest, but with a respirator pouch, UK sized, mounted on the right side under the armpit and behind. Not designed well, very unhandy.

No picture of this vest, sorry


CQC Danish Army SOF vest (Purchased ~2000) Overall a decent vest, pouch layout not optimal for my needs. Buttpack is a big plus for longer infiltrations and long days on the ground. Large sized. Can be used on top of the issued bodyarmor.


Custom Jayjays Brecon vest, (Purchased ~2001) Good layout of pouches, like I wanted it, but size wise it was cut to the same small size as the UK 95 pattern combat vest. Not large enough to wear over the bodyarmor for me. Our bodyarmor was significantly bulkier at that time, than the UK issued bodyarmor.


Close Combat Gear vest (Developed and produced 2003)

This was a vest, that 2 friends (1 DASOF + 1 Homeguard) and myself designed and developed and brought into production, with the lessons learned from other vests taken into consideration. Overall I was very happy with the end result, but there was some compromises we had to take to make the appeal wider than SOF applications. Mounted magpouches and breast pouches on the front. PALS webbing on the sides and rear for pouches and buttpacks. Integrated hydration pouch on the back for a 3L bladder. Loads of internal organization options and chest pistol pocket.

From DASOF input, we had discussed the option of making detachable plate pockets, to be strapped to the inside of the vest front and rear, if your mission required protection. Think long sneaky infiltration and recce followed with an assault on an objective. So, no plates for the infil and recce part, then strap on the plates for the assault. But we didn’t get to that, considering overall time to deliver it to the market and overall costs of production. I also discharged from the army end of 2004. Looking back, this is my biggest regret, that we didn’t get the plate pockets and mounting points integrated into it from the beginning.


Israeli IDF combatvest “Dolphin” (Issued PSC 2005)

Surprisingly light and comfortable, with foam parts towards the body. Pouches were mounted, not optimal layout, so I cut all the pouches on the back off. Useable and would use one again.


Category:

Chestrigs:

Why use a chestrig?

Chestrigs basically makes sense, the same places a loadbearing vest makes sense. When your back needs to be free, mounted in vehicles and if you are living out of a large rucksack.

Smaller carrying capacity than a loadbearing vest = Better mobility. Not great for long periods in the prone position, unless you have a split front version.

Advantages of a chestrig is that you only carry the most essential equipment. Great comfort in vehicles or with a rucksack. Possible to vent the front of the body with a rucksack and a split front version. Belt mounted system is better in the prone position.

So what have I used?

Arktis 3 magpouch Chestrig (Purchased 1994)

This was a clip-on design for the Arktis beltkit harness/yoke, for those days where 8 mags of 7.62 or 12 mags of 5.56 just wont cut it.


Arktis 42 pattern (Purchased 1995-96 i Olive Green and in 1998 in M/84 camo) (X-strap configuration)

3 magpouches on the front for either 3×5.56 or 2×7.62 mags each. 2 utility pouches, one on each side. Probably the most basic, useful designed chestrig I have come across. This is the chestrig I, initially, measure all others against. I still have it.


US Molle Rack (Purchased 2001) (X-Straps)

The first PALS/Molle chestrig I tried. I was not a fan of the bib flap at that time, as our standard was still to dump partial and empty mags into our jackets.


Blackhawk AK47 Chestrig (Issued PSC 2005) (X-Straps)

Simple chestrig for AK47 mags. At that time I was issued an AK, but went away from this chestrig very fast, as the weight of 8-10 AK mags was too much and very uncomfortable to wear in this rig.


DBT Low Profile Rack. (Purchased 2005) (X-straps) Really well designed chestrig, which later morphed into the Mayflower/Velocity Systems Chestrig Gen IV with H-Straps)


Blueforce Gear Tenspeed chestrig. (Purchased 2010)

H-Straps. Simple, super lightweight, Low profile, limited carrying capacity. Cut the harness off and mounted fastex buckles, and mounted it on my Mayflower LPAC for low vis profile jobs.


Mayflower UW Low Profile Chestrig. (Purchased 2010)

H-Straps. Pure PALS/Molle Chestrig, which I setup very much like my Arktis 42 Pattern. 3 mags on the front, utility on one side and IFAK on the other)


ChiCom AK47 Chestrig (Purchased 2017)

X-Straps, thin. Simple “OG” Chestrig which holds 3 AK or 5.56 mags and some grenades. Too simple design for me, but still “OG” cool and really cheap on eBay. I will keep this until the revolution begins for LCF points.


Chestrigs with rifle plate pockets on the front:

Same advantages as regular chestrigs, but with the possibility of carrying a rifle plate on the front, behind the bib flap.


Blackhawk Strike Rack (Purchased 2003)

Both X and H-strap configuration possible. I choose to use H-strap configuration, as I find it relieves chaffing on the neck and is more comfortable. The possibility to have a rifle plate, meant I was carrying a plate, where most others didn’t wear any bodyarmor during our Iraq deployment in 2003-04. (Note: This was right after the invasion and before the insurgency really got started, things were relatively quiet, with the odd skirmish here and there)


Crye AVS Chestrig (Purchased 2014)

Special Y/X straps harness, very technical design, some might say it’s a bit over the top, but it works really well. Possibility for front plate and combined with Crye’s AVS 100 Pack, you can have a rear plate also. This is very cool and combines the same ideas we originally thought of integrating into our CCG vest.

However it is expensive for the complete system, chest rig, harness and the pack.

But honestly, if I was in a position to wear a chestrig today, this is what I would wear. Honestly it is probably the most underrated Crye Precision product on the market.


Category:

Platecarriers (Which holds 2 Rifle plates):

So, a little background information is required here:

Platecarriers were designed and taken into use, because the regular bodyarmor, that was issued, like our Fragmentationvest, the US OTV, IOTV and SPEAR cut vests were too large and bulky and limited mobility.

It is virtually impossible to catch a local in a dish dash with sandals and an AK, when you are carrying 20-30+kilo more than him. Also scaling a 2 meter wall is virtually impossible on your own in real life.

It is basically the same balance you have to take if you are designing armor for a tank or an infantryman: Armor vs. mobility.

Mobility gives the commander maneuver options, that few of them seem to have balls or brain capacity to use to their advantage.

Armor perhaps, mentally, makes the letter writing, to families of deceased easier and doesn’s hurt your career. Meaning, if as a commander you had ordered all the armor all the time, you had done your very best (percieved) to ensure their safety.

Modular and scale-able armor systems are not always an advantage, if you don’t have a commander, who knows, when to scale up and down the armor system, to best accomplish mission goals. All the armor, all the time, is not the point of a scale-able system.

So what have I used?

HSGI Wasatch (Purchased 2003)

PALS/Molle webbing everywhere, internal magpouches. Badly designed rear lower part of the carrier. Ended up flipping that part up and tying it down with paracord to add stability.


Blackhawk Strike platecarrier (Issued PSC 2005)

PALS/Molle front and rear, padding towards the body, webbing straps and buckles on the side. Simple and works well.


Tactical Tailor platecarrier (Issued PSC 2005 and 2010)

Basically 2 shoppingbags with PALS/Molle webbing. Plates move around inside. Strong candidate for the worst platecarrier ever designed. Seriously, it’s that bad.


Diamondback Tactical FAPC 1 (Purchased 2005)

Great design, PALS/Molle webbing coupled with velcro on the front. Cut to fit US SAPI plates and sizes, so no plates sliding around anymore. Stable and comfortable, I used this a lot.

In 2006, I ordered the DBT cumberbund for it, but only used it once, then took it off again.


AWS Inc Platecarrier (Gifted from AWS Inc, 2005)

Also like 2 shopping bags, plates moved around in it. Interesting attachment system, that interfaced with AWS’s other panels from their assaulter vest. Tried mounting the DBT cumberbund on it, but was not satisfied with how it worked out.


Paraclete Hard Plate Carrier (Purchased 2005) Generally like the DBT FAPC, but no velcro on the front and no buckles on the side straps, just velcro.


Paraclete HPC with Cumberbund (Purchased ~2006-07)

Further development from the regular HPC. Better load carrying capacity than a regular HPC. I used this a lot.


Paraclete SOHPC (Purchased 2008)

Another further development from the HPC w/CB. They added a velcro front flap and softarmor in the cumberbund. I did not like the front flap flipping, with a 3 magpouch attached and the cumberbund was larger than the non armored one. Like all platecarries with a cumberbund, you tend to overload it.


LBT 6094 Slick (Purchased 2011)

A favorite of mine, simple, comfortable and slick. The front flap didnt bother me, as I did not have mags attached to it, but wore a chestrig on top.


Crye CPC (Purchased 2013)

Great design, best load carrying ability and weight distribution of all the carriers I have ever owned. Good ventilation compared to all others as well. However it felt too bulky and I still couldn’t get to terms with a front flap opening. At that time, I got this, I traveled a lot with my gear all over and it just wasn’t suitable for that.


Crye JPC (Purchased 2013)

Another favorite of mine, simple design, comfortable to wear, 3 mags on the front, but with a flap and a minimalistic cumberbund.


Paraclete HPC PJ Guardian Angel Carry Kit (Purchased 2017, to check out the design)

This is a weird mix of a platecarrier and a RACK morphed together, but I guess the PJ’s got what they asked for. The large buckle on each shoulder is simply a bad design, as they sit exactly where the butt of your rifle goes. But I guess that was for getting the thing off in a hurry if you’re a casualty.


Crye Airlite EK01 (Purchased 2017)

The lightest platecarrier I have ever tried. Minimal design, so you only carry the essentials, ammo, water, TQ’s. No cumberbund or front flap. Yay! Less is more.


TYR Tactical PICO MVW DA M/12 (Issued 2018)

This is the issued platecarrier of the Danish Armed Forces. Padded towards the body, very adjustable and comes with all the attachments and armor pieces you can imagine along with the armored TYR Brokos belt and X-Frame for distributing the weight from the upper body to the hips. All in all, it is a very good platecarrier on its own, but it is too heavy if you use all the parts at once. I have written about the upgrades i have made to this in another article, so go and read that for more pics and considerations for improvement.


Category:

Fragmentationvests / full bodyarmor vests:

So what have I used?

Danish Army issued fragmentationvest, M/92 to M/2000 (Issued 1992 to 2004)

All versions of this fragmentationvest sucked. Too big and bulky, limiting mobility. In the beginning (1992) we were only issued an extra square armor pack of softarmor, that fit into the chest pocket, so on the front part of the chest, the armor could stop a 9mm pistol round, since the rest of the vest was only NATO Frag rated. Later on, upgraded with a ceramic plate in the front, then later a plate in the back as well, then lightweight dyneema plates and so on. The basic design was kept through out with the only real change being the addition of 2 single magazine pouches on the front panel. Many tore the shoulder protectors off or they got “accidentally ripped off”, during vehicle work. While it had excellent coverage, it was too limiting for movement and breathability for the body.


Diamondback Tactical Predator vest (Issued PSC 2005)

SPEAR cut armor, more ergonomic than the Danish issued vest, so that was good. The Predator vest was basically a rip-off of Paraclete’s RAV, just with other shoulder adjustments and no cut away feature.


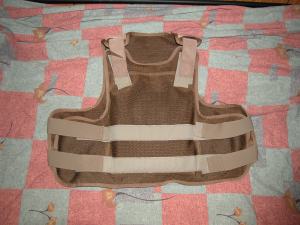
Paraclete Low Profile carrier (Purchased 2005)

Paracletes SPEAR-like armor cut. Just a simple low profile carrier for soft and hard armor, without any pouches. I had a sewing shop modify mine with 2 rows of PALS webbing, so I could carry 3 mags on the front. This worked great under a shirt or a 511 vest or the Israeli Dolphin vest. Good for those times where you dont want or need to look like a gorilla. However not exactly a covert carrier.


AWS Inc. CQB Assaulters vest (Purchased 2005)

SPEAR armor cut vest, witha combination of PALS webbing, velcro and press stud buttons for attachment of modular panels. Heavy construction with layer upon layer of materials and an outdated modular system.


Paraclete RAV model 2003 (Issued PSC 2005)

Paraclete SPEAR-like armor cut. Very modular system, but with room for improvement. Cut away, a big plus.


Paraclete RAV model 2005 Commo version (Purchased 2005)

The Commo version of the ’05 RAV had PALS webbing and velcro underneath the cumberbund, so you could mount opentopped magpouches behind it. Close to being the perfect “full heavy” bodyarmor vest I have ever seen. can be upgraded with neck, bicep and sideplate armor. I tried wearing that once on a redzone mission and realized I wouldn’t be able to fight in it or move any distance effectively. So off it came.


Mayflower Low Profile Armor Carrier (Purchased 2010)

This was the first vest utilizing the swiftclip system, where you clip a chestrig or panel onto the vest along with velcro, when needed, instead of having a set of straps going around your neck and the two being separate items. I loved that concept and execution and am a big fan of it for certain roles.


Category:

Daypacks/Assaultpacks:

So what have I used?

Berghaus Munro 35L (Purchased 1991-92)

Versatile, robust and simple top loading daypack. Internal frame. Side pouches from the PLCE rucksack can be attached via the side compression straps for more capacity.


US AAFES PX copy of an Eagle AIII Pack. (Purchased 2001)

Got this from a AAFES PX in Pristina, Kosovo. No internal frame sheet. Not worth the money. Shoulderstraps tore off relatively fast. Volumewise, maybe too big to be a daypack (?)


Arktis Patrol Pack (Purchased 2001)

Toploader. No internal frame. You could zip the sidepouches from the PLCE rucksack onto the sides. Not stable enough. Daypacks need an internal frame of some sort.


Kifaru Marauder (Purchased 2002)

Panel loading pack. Internal frame. Used primarily as an aid bag. very complicated design and an plethora of buckles and straps. But it wore well.


B

Lightfighter RAID pack (Purchased 2004)

The RAID Pack is based upon the basic design of the Eagle AIII pack, with another front flap with PALS webbing and loads of straps and buckles. Created for a specific purpose, it is actually one of the most versatile packs I have ever used. I still have it, it’s packed and ready to go, for when the revolution starts.


Kifaru E&E pack (Purchased 2005)

Great little pack for the bare essentials, like, extra mags, grenades, snickers bars and Gatorade in a bump scenario.

Heavy construction. Still have it, love it.


Karrimor SF Rygsæk 35L (Issued 2017)

Panel loader, no internal frame. Good padding and adjustability. Integrated raincover in the bottom, that folds out over the entire pack. Front has a beavertail (Not shown in the photo) that can hold stuff, like raingear for fast access etc. PALS webbing front and sides, and inside the pack there is also a few rows of PALS webbing and a hydration pocket.  On the body facing side of the outer pack, there is a large document pocket.

Hasn’t fallen apart yet and I use it on a daily basis.

All in all, I’m actually pretty impressed with it.


Category:

Rucksacks:

So what have I used?

German Bundeswehr rucksack (Purchased 1985)

Primarily used as a boyscout. Outer from canvas, no frame, actually was modified with old US H-Harness as shoulder straps. Soaked water, so heavy when wet.


US Alice Pack (Purchased 1986)

Used initialy as a boyscout and later on when I joined the army. Primarily used without the frame as it packed easier in vehicles. Limited capacity for a rucksack for Northern European climate conditions.


UK SAS Bergen (Borrowed from a friend in 1987, with intent to buy if satisfied)

Worst shoulder straps and frame on any rucksack ever, Too thin, basically you are carrying all the weight of the pack on two 25mm straps on your shoulders. Seriously, put 15-20 kilo in the pack and 5  minutes later you have lost all the feeling in your arms, because the bloodflow was stopped.

1 week trip in the Swedish Fjells was enough. I shouldn’t have to say, that I did not end up buying that pack.


Lowe Vector Sailent 70L (Purchased 1990)

Adjustable back, internal frame. Extremely good and versatile rucksack with top tier design and construction from that period. Still a great pack today.


Berghaus Vulcan 120L (Purchased 1993)

This is the rucksack that the PLCE rucksack is copied from. But this rucks has obviously better quality and execution. Better padding, ventilation channel along the spine, hipbelt that actually transfers the weight to the hips, super comfortable. Tempted to fill it to capacity every time.


Lowe Vector Commando 120 L (Purchased 1994)

Very close to being the ultimate miltary rucksack for big loads, that needs to be carried a long way. Adjustable back, internal frame, Radio pocket, sleepingback pocket divider, pockets on the sides for snacks or explosives. Webbing for attaching even more gear on the outside. Jumpable. Tempted to fill it to capacity every time.


Danish Army M/96 Rucksack, PLCE (Issued 1996)

Toploader, internal frame. Copied from the Berghaus Vulcan. Must be used in conjunction with the beltkit, so it can rest on top of the pouches, when you have to to carry it far with a heavy load. The “hipbelt” on the pack is a bellyband, nothing else, it is there to hold it tight to the body, so it doesn’t slide off the shelf you have made with your pouches on you beltkit. As a complete system, it actually works pretty decent. Learn its strengths and weaknesses and how to properly pack a rucksack and it will serve you well.


Category:

Boots:

With regards to boots, it is very individually what fits and works for different people. Though the years, I have discovered that my feet prefers a light breathable boot. Wet feet sucks, but 15 years with foot fungus also sucks. Goretex socks are a good thing to have when the weather is crap.

When I began in the army in July 1989, it took less than 2 weeks for me feet to develop foot fungus and no cream or ointment helped. It only went away about a month or two after I left the Army and only wore hiking shoes during that period. Because of this, in all the time I was a civilian I never wore boots again.

So what have I tried?

US Jungle Boots, Vietnam edition (Purchased 1985-1989)

Green canvas upper, lightweight, breathable, fast drying. After 1990, they were virtually impossible to get a hold of. Not good for long walks with heavy packs. But for general field use, they worked alright for me.


Danish Army M/58 boots (Issued 1989)

Blister-Master 2000. Those boots and I never got along. Combined with the heavy wool socks, they were most likely the reason I got foot fungus in the summer of 1989. I tried resoling them with a Vibram sole and using insoles to counter the blisters, but it never helped.


US Jungle Boots, Black (Purhased 1986-2004)

New improved edition of the old jungle boots, but with a new sole and nylon upper. These were my go-to boots for field use most of the year and most of my service time. Had a pair of gore-tex socks in my kit, when it was rainy and cold. Probably wore out 3-4 pairs of these. Still, not a good boot for long walks with a rucksack.


Swedish Army Winter boots. (Issued 1993)

Hot even under extreme cold weather. Terrible to wear though, it felt like a pair of Dutch wooden clogs. But the Swedes know something about winter warfare and a soldier with dry warm feet is more effective than one with cold wet feet. Used during the wintertime in Bosnia 1993-94.


Matterhorn Gore-Tex boot. (Purchased 1995)

Matterhorns copy of the Danner Ft. Lewis boot. Better than jungle boots in the winter, decent walking boot. But if you get water in from the top, they take a about week to dry out in the field. Nice Vibram sole, meant you had lots of grip, compared to the issued boot.


Danish Army summer boot, green canvas or nylon (Issued 1996)

Without doubt, the best boot the army had ever issued me. Very breathable since the entire boot except the sole, of course, was made out of green canvas or nylon. Fast drying. The sole resembled the sole of the old green Vietnam era jungle boot. Only lasted a 6 month deployment to Bosnia in 1996.


Magnum Hi-Tec (Purchased 1997)

Like wearing running shoes, but dont get too close to a patch of wet grass. Super camp or peacekeeping mission boot.


Danish Army summer boot, Lebock. (Issued 1998)

Abysmal. Like wearing a pair of rubber boots. No support whatsoever.


Desert boots, US (Issued 2000)

Standard US Desert boot. Good desert boot, but maybe not after 20 km’s with 20 kilos of marching.


Danish Army Desert boot, Lebock, (Issued 2003)

Just a tan suede version of the black summerboot, still sucked.


Ecco Track boot. (Purchased 1999)

Super comfortable boot, waterproof with Gore-tex, so dont get water inside. The soles selfdestructed on both my pairs. Limited ankle support compared to a true hiking boot.

Sålen selvdestruerede på begge par jeg havde. Begrænset ankel støtte.


Oakley Assault Boots (Purchased ~2002) (Gen 1)

Super comfortable  “Foot-Vagina”. Like wearing running shoes. Hot, not waterproof. The soles made a lot of noise walking on floors inside buildings.


Meindl Island Pro Gore-Tex (Purchased ~2002)

Best field and marching boots, I have ever used. Fantastic ankle support, waterproof, but dont get water in through the top.


Oakley Desert Assault Boots, (Purchased ~2003-04) (Gen 1) Again a  “Foot-Vagina”, now in tan suede. The soles were not as noisy as the black version, but they were meant for the desert, so…


Meindl Desert Fox (Purchased 2003)

Best allround desert boot I have used. My feet and Meindl’s fit very well.

Later on, these boots became an issue item for Iraq and Afghanistan deployments and as unfortunately the quality control at Meindl’s factory was not good enough and lots of complaints came in about the boots falling apart. I bought mine before they got the contract, so my pair lasted until I gave them to a local we had working for us.


Danish Army, Jolly boots (Issued 2004)

Didn’t fit me well. The best thing about these boots, was that we were issued Smartwool socks along with them.


Alt-Berg light combat boots (Issued 2016)

Not so bad, out of the 4 different types of boots available at that time, I was issued them, they were the most comfortable pair. I used these for about 2 years. I had to get a size up from my normal size for them to fit.The issued socks are terrible though.


Alt-Berg Heavy combat boot (Issued 2016)

I didn’t get along well with these either. Large, heavy, clumsy, too stiff. Din’t fit well. Handed my pair back in to the supply depot and wore the light combat boots instead, year round.


Danish Army Boots, Combat, Light, M/18 Meindl. (Issued 2018)

In fall of 2018, new boots were introduced in the army. There should now be 10 different styles to chose from, but most supply depots only have a couple of different types of boots on hand, but can order sizes for you. On hand at my base, they had Haix, Light and Heavy version. Altbergs, Light and Heavy versions and Meindl light version.

As soon as I put my feet into these it felt like coming home from a long trip. True to size, I’m a size EU 42 and that’s the size that fit. In the Altbergs, I had to go up one size for them to fit. Time will tell how they hold up, but since my job isn’t exactly the most field active anymore, I’m sure they will do ok. Gore-Tex lined.


Danish Army Boots, Combat, Heavy, M/18, Aku Griffon (Issued 2018)

I had the supply depot order me a pair of these as my second pair of boots and they fit very well. I would say they fit even better than the Meindl’s. True to size. This is the heavy version and is one of the 10 different styles and makes of boots available. Again, just been issued these about a month or so ago, so only time will tell how they hold up and perform. But I’m sure they will be just fine in my job.

My only concern is that there is no real summer / hot weather boot available. Most of the new boots that are being offered come with a Gore-Tex liner, which is fine for winter and cold wet weather. But with the extremely hot summer we have experienced here in 2018, I probably will not wear these boots with Gore-Tex next summer.


Category:

Rain gear:

Proper raingear is a must have for a soldier. It needs to be waterproof and brethable or you will not be a happy camper.

So what have I used?

Danish Army, M/84 rain gear, jacket and pants set. (Issued 1989)

Coated lightweight ripstop nylon. Green on the outside, white on the inside. 2 minutes in a light drizzle and you was soaked. Not breathable. Catastrophic. The common joke was they they had mixed up the fabrics for the raingear and the fabric for the field towels.


US Army rain jacket, Olive green (Purchased 1989)

Also not breathable, but made of a thicker material, so kept the the rain out at least. But soaked you from condensation on the inside.


Helly Hansen Helly Tech (Purchased 1990)

My first set of breathable rain gear. Black outer with a neon yellow inside liner. So had to be worn underneath my combat uniform. Probably saved my life on a 2-3 week exercise in 1990.

Sorry no picture available of this item.


US ECWCS set, Gen 1 (Purchased 1995-1996)

Woodland pattern Gore-Tex. 100 times better than anything I had been issued or tried at that time, but had some design flaws, like a moisture transporting liner, that actually transported the water from the outside up along your arms, so you had wet arms most of the time in wet weather, a short while after the rain had started. Excellent hood design. Most of the guys in my unit bought these and wore them almost exclusively in the field, instead of the issued combat jacket. Our Battalion Commander approved them for wear, since our unit probably had the most field time of any regular army unit at that time and he recognized, that the issued raingear was a catastrophe. Good guy.


Danish Army Motorcycle Messenger raingear (Issued 1998-99)

Better than the regular raingear, but not breathable, so you got wet anyway. After our deployment to Bosnia as Light Scouts, we had to hand it back in.


Arktis Waterproof smock (Purchased 1999-2000)

Waterproof smock with a waterproof liner, still in use and approved for wear in uniform today in Multicam, until a new clothing system is to be issued in a few years time. A little too hot in the summer, but pretty good the rest of the year. Only minus was the outer fabric soaks water after a while and the jacket become heavy when wet, but I have never had mine leak. Stuff in your pockets should be waterproofed with plastic zip-loc bags


Danish Army Raingear M/96 (Issued ~2000)

Gore-Tex type material, cut too large in the sizes. The legs were like two balloons, but actually waterproof and breathable. Major improvement compared to everything else issued up to that point. Used the rain pants once, then decided I would rather be wet on my lower body, than listening to the swoosh swoosh every time you took a step.

Funny story, when I attended a Tactical Medicine Course at H&K International Training Division in San Diego in the fall of 2004, there was a SEAL, who fell in love with the issued rainjacket and grabbed it from me and said I would not get it back and I could grab anything from the back of his truck as a trade. So I grabbed his MICH 2000 helmet with NVG mount, joke’s on you, buddy.


Arcteryx LEAF Alpha (Gen 1) (Purchased 2005)

Buy once, cry once. You get what you pay for. Without a doubt, the best raingear on the planet. Minus; Expensive, like very expensive. Pluses; The best designed and constructed raingear with a lifetime warranty. I still use this on a pretty regular basis, especially the jacket even after 13 years. Definitely one of the best purhases I have ever made. But the prices today are pretty steep for soldiers to pay out for a set.


Danish Army issued raingear M/12. (Issued 2016)

The raingear is markedly improved over the old version. The jacket is improved with internal pockets and is actually useful. The pants are cut slimmer, so the noise levels are down, but there is direct access to your combat pants underneath, although they have a coverflap, water still gets through to the inside when in the prone. Also the weird placement of a button on top of a velcro field, makes it had to unbutton, when you need to. The legs have zippers, so in theory you should be able to take the pants on and off with your boots on, but in reality, the zips catches the fabric and binds, so I have not been able to do that on mine, ever. This should be redesigned.


Category:

Internal layers:

It is a lot easier to mention materials, instead of going through all brands and stuff I have used over the years.

Cotton = No Go. When wet it drains heat from the body, doesnt breathe, chaffes on inner thighs

Polypro a’la HH Lifa =Stinks after a day, if you dont stink after 2 days, you are not human.

Coolmax = Decent sweat wicking material. but also starts to smell.

Under Armor = Fantastic sweat wicking abilities, but also starts to smell

Silk = Depending of the type and quality, it can either be fantastic or suck. I love my silk boxershorts.

Merino wool ? The best inner layer material I have used yet. Depending on the brand, some itches more than others do. Try before you buy. Doesn’t smell foul after a few days like all the synthetics do.


Category:

Middle layers:

The issued pure knitted wool sweater, commando pullower, was too itchy and I rarely used it, maybe a total of 3 times in all my years in service.

The issued fiberpile jacket M/84, was ok, when new. But when I got issued one in 2016, I could look straight through it, so thanked no and handed it back. If that is the best you can do, I will buy my own middle layer, thank you.

Polartec Fleece in various thicknesses. I was a big fan of these for many years and they still work well, for instance the Polartec Powerstretch is a big favorite among soldiers here.

The Snugpak Sleeka jacket I have had for many years. Its like wearing a sleeping bag, thats how warm they are. Really good, but quite bulky in the large and extra large sizes.

My current favorite middle layer at the moment is the Arc’Teryx LEAF Atom LT jacket with Coreloft insulating material. I use the Jacket, not the hooded version, as it goes easier underneath issued clothing without the hood. Best middle layer I have used yet.

This wraps up what I initially thought would be interesting for people to read.

If you have any questions or comments post them below.

Remember: Never become a casualty because of your equipment.

The Combat Triad UK ver.

To be an effective warrior, you should master, what Jeff Cooper described as, the The Combat Triad.

It consist of 3 elements.

  1. Mindset
  2. Gun handling / Manipulation
  3. Marksmanship


Generally accepted interpretation:

Mindset, is the basic foundation, everything builds upon. If you are not mentally prepared to use your weapon, the pyramid falls, everything else doesn’t matter.

Gun handling / Manipulation, means you must master every aspect of your weapons; the manual of arms, controls, carry method, where it is pointed at all times and the safe employment into any firing position.

Marksmanship, is being able to hit your intended target, fast and with precision under all conditions and ranges for that weapon.

The 4 safety rules

It never hurts to repeat these rules.

If everyone always follows these rules, you will never have a negligent discharge.

  1. All guns are always loaded.
  2. Never let the muzzle cover anything you are not willing to destroy.
  3. Keep your finger off the trigger until your sights are on the target.
  4. Be sure of your target and whats beyond it.

Hello world!

Welcome to the new tactical.dk website.

The old website is gone and we are starting on a new note, but the mission stays the same:

This will primarily be about topics that affects the soldier on the front line, so no, there will be no posts on new fighter aircraft’s or submarines (Danish joke), but more thoughts and experiences on skills, gear and weapons, which could be be beneficial to the infantryman.

Stay dangerous !

safe-or-deadly

SIG P320 X-Carry – First impressions

The first batch of instructors has received formal training on the new Danish Service Pistol SIG P320 X-Carry and since I probably won’t get mine until after New Years, I thought it prudent to ask one of those, who very recently got his hands on one, for his first impression of it, after having gone through the formal instructor training and live fire portion, in preparation of receiving the pistols and conducting service-wide instruction.

He agreed and what follows beneath is his words and impressions.

(Admin note: I have translated the text from Danish to English for international readers and have tried to convey the account as accurately as my English skills allow)


—–

SIG P320 X-Carry – First Impressions.

Some new pistols come to the market and get a lot of hype. One of those actually won the selection to be the new Danish Armed Forces Service Pistol.

But does the SIG P320 X-Carry live up to it’s hype?


My training on this started as all others have, with disassembly and re-assembly. The locking mechanism is heavily inspired by the Browning locking system and looks similar to what we know from the SIG P210 and the H&K USP. Disassembly of the pistol also pretty much follows the same procedure. However the re-assembly does not. Contrary to most other pistols we have in the Danish Armed Forces, you have to insert the takedown lever before you push the slide and recoil spring onto the frame.

Why is this noteworthy? Because if you get lulled into an old routine way from other pistols of re-assembling the pistol, without the takedown lever in place you will have trouble disassembling it again, to correct it, without disassembling the firecontrol unit and the frame.

It’s not a big operation, but it does require that you get your issued multitool or another thin tool out to move the recoil spring back in place, after which you can disassemble the pistol. The takedown lever itself can be difficult to insert if you don’t have the correct angle.

This might paint a picture of a nightmare re-assembling the pistol, but in reality it’s not that bad. However, if you are in a unit, where you only get hands-on once a year for re-qualification, you might see some frustrations among the shooters.


Another thing that was apparent was the ejector. This is an integral part of the fire-control unit, bent in the same piece of metal which is the fire-control unit itself, meaning the only serialized part of the pistol.

Only time will tell if this was a bad idea, since you can’t exchange the ejector if it gets worn out. My best guess is that this will be one of the main reasons that pistols will be discarded in the future. Normally, you can exchange barrel, ejector, extractor, sear, hammers and various springs when they get worn out. On the old SIG P210 Service Pistol, basically the only way to discard the pistol was if the slide to frame tolerances were off the charts and with that full slide to frame rail fit on that pistol, that would take a long time.

The ergonomics are good. My hands are pretty small, but the pistol seems to have a smaller grip circumference than, for instance, the H&K USP. If you have big or very small hands you can change out the grip to another size.

The grip angle feels close to a 1911 angle, which was apparent when I drew from the holster. For me, that meant, my natural point of aim on the X-Carry was a lot like that from my privately owned pistols. But if you have been brought up on Glocks, it might point a bit lower, than what you are used to.

The grip comes with grip-tape parts. The coarseness of the grain is probably similar to a 120 grain, but personally I use 60 grain on my guns. I like the more aggressive surface of that, but that is personal preference. As long as you apply enough grip strength it should suffice.

On the top part of the grip-tape, there is a hole for the SIG logo, which probably wasn’t the smartest idea, since this is where the meaty part of the palm on your weak/support hand gets placed and helps the most. Especially when SIG SAUER has been so considerate to undercut the trigger guard. Generally I would have preferred that the grip-tape panels were bigger and covered more. However I do believe that we have got a better solution than the Americans have on their M18.

Lastly, on the grip portion, I would like to mention that our pistols come with a magwell, which the civilian X-Carry doesn’t have. Aside from greatly helping out with speed reloading, it might also be beneficial for those with very large hands. The pistol comes with 3 ea. 21 round magazines.

The slide has serrations front and rear, but our instructors recommended that you power stroke the rear of the slide. Meaning an overhand grip with your thumb pointing in towards you.

Personally I have never been a fan of that method and proceeded to mainly use the front of the slide.

The civilian version of the X-Carry has a lightening cutout on the top of the slide, the military version, we are getting does not have that. On the top of the slide there is “FMI” engraved on it instead. If I was issued the pistol, I would not rule out that I would attach some grip-tape there across the “FMI” and around the sides. Wet or bloody hands might prevent a proper grip on the slide, even when using the power stroke method. It is not the largest pistol and combined with cold weather, I believe extra grip tape is a worthwhile addition.

A quick note on the sights, before we get into trigger pull and recoil etc.

The front sight is from Truglo and has a green outer ring around a tritium dot. The green ring is very visible and tracks really well shooting fast at close in distances where you have “target focus”. However it is a very wide front sight and I believe that was the reason my split times were pretty slow at distances greater than 18 meters. There is light on both sides of the post, in between the rear notch when in a regular shooting stance, but with such a wide front sight blade you have to really concentrate, especially when such a large part of the target is hidden behind the front sight blade.

The rear sight is mounted to a cover plate in the cutout for an optical sight. They are fixed non-adjustable. Only the SIG Romeo 1 sight fits this cutout, so if it is decided to purchase optics for them later, you are limited to the SIG Romeo 1 sight. Unless they make an adapter plate for the slide. (Admin note: I have been informed by an authority that the optic footprint on the issued pistol is cut for the Leupold Deltapoint Pro, which also fits the SIG Romeo 1 MRDS without the need for adapter plates, as the only pistol in the selection process)

One of the criterias for the new pistol was, that it had to be striker fired and not a single action trigger, as we know from the SIG P210, or a double action/single action as we know it from the H&K USP.

Let me start by saying, the striker fired trigger on the X-Carry is without comparison, the best striker fired trigger I have encountered. It does not have the squishy waterpistol trigger of a Glock. There is virtually no creep on the takeup. It is obviously not like a glassneedle breaking, but I have experienced worse single action triggers, that were heavier and with a lot more creep than the trigger on the X-Carry. I had hoped for a shorter reset and since I primarily shoot 1911 single action triggers in civilian competitions I had a few bad follow up shots. These slow splits most likely looked for onlookers like triggerfreeze, but that just proves that when you are used to a really good trigger on your personal pistols, that can catch you out when you try to race with another type of pistol.

The bore line is placed higher than on a Glock, but I did not notice that during recoil at all. The light weight of the slide probably counteracts this. Especially shooting strong/primary hand only, my expectations of bigger recoil impulse were put to shame. I have not experienced such an easy-to-adapt-to recoil impulse in a long time..

The holster, belt and magpouches also deserves mentioning. Most items are from Safariland, except a double magpouch with molle from Protech for the TYR system.

The holster has SLS and ALS retention mechanisms, but is surprisingly easy to use. The holster is mounted in a Safariland QLS system and it comes with molle adapters and 3 different lenght (UBL) belt adapters in the kit.

The belt is a Safariland ELS, but none of the adapters nor the magazine pouches are ELS compatible. I got the impression that the intent was to purchase ELS magpouches in the future. This also means that Military Police and Security personel could mount Safariland pouches for Pebberspray, handcuffs etc. via the ELS system.

The belt comes with an inner belt, which could use an upgrade as the inner belt doesnt have any buckles and the only way to tighten the belt is via the velcro. I use a Safariland ELS belt for my competition rig, but have chosen another inner belt where one end of the belt is threaded through a buckle, before being pulled back and velcroed onto itself. This was you can tighten the belt. Personally I would start looking at a very thin belt with loop velcro on the outside and a small cobra buckle.

So, in the end,  was all the hype justified?

For me, I am left with the feeling that the Danish Armed Forces has bought the best pistol available. The pistol might not be perfect, but that is mainly from a personal preference standpoint. But if any of the other competitors were better than the X-Carry, they would have to be a “Wunder-Waffe”


About the writer: He is active duty military and a pretty decent pistol shooter and a Danish National IPSC Champion.

SIG P320 X-Carry, Et førstegangs indtryk

Da de første nu er blevet omskolet til den nye Værnsfælles Pistol SIG P320 X-Carry og jeg selv nok må vente til engang efter nytår, så syntes jeg det var oplagt at få input fra en af dem, som er blevet omskolet fornyligt i forbindelse med uddannelsen af instruktører, som skal stå for den brede omskoling når pistolerne ankommer.

Så jeg spurgte en jeg kender, som lige er blevet uddannet og omskolet, om han ikke kunne tænke sig at skrive et indlæg og komme med sine indtryk efter omskolingen. Det var han helt med på og det er hans ord og indtryk i kan læse nedenunder.

—–

SIG P320 X-Carry – Et førstegangsindtryk.

Nogle gange ser man et voldsomt hype omkring en ny pistol der lander på markedet, og en af dem gik faktisk hen og blev vinder i udvælgelsen af den nye Værnsfælles Pistol. Men giver Sig Sauers X-Carry så et førstegangsindtryk, der er alt den hype værdig?

Min omskoling startede, som alle andre våbenomskolinger, med adskillelse og samling af pistolen. Låsesystemet er stærkt inspireret af Browning låsesystemet, og ligner det vi i Forsvaret kender fra Neuhausen og USP’en. Og adskillelsen er da også i samme rækkefølge, men samlingen er derimod ikke. Imodsætning til de fleste andre pistoler vi kender i Forsvaret, skal man montere slædestoppet før slæde og rekylfjeder skubbes på rammen.

Og hvorfor er det så nødvendigt at nævne? Jo fordi skulle man alligevel køre lidt på rutinen, og monterer slæden på rammen inden slædestoppet er isat, vil en adskillelse være tæt på umuligt uden at skulle adskille aftrækkermekanismen og rammen.

Dette er dog ikke en større operation, men kræver dog, at man finder sit tool eller et andet smalt værktøj frem for at kunne rette rekylfjederen på plads igen, hvilket så muliggøre adskillelse. Selve slædestoppet kan også være besværligt at isætte hvis det ikke gøres i den rigtige vinkel.

Nu maler jeg måske et billede af, at den er en pestilens at samle, og så slemt er det heller ikke. Men i enheder hvor man kun får pistolen i hånden til den årlige dag, der er afsat til vedligeholdende uddannelse, vil man klart kunne spore en frustration blandt eleverne. 

En anden detalje der sprang i øjnene, var udkasteren. Den er en integreret del af aftrækkermekanismen, stanset ud i samme stykke metal der udgør aftrækkerhuset, altså den eneste del der er på serienummer.

Kun tiden må vise, om det var en dårlig ide, at man ikke kan skifte en slid del, som en udkaster. Men mit eget gæt er, at det bliver en af hovedårsagerne til, at pistoler bliver kasseret på sigt. Normalt kan man skifte pibe, udkaster, udtrækker, sear, hammer og diverse fjedre i takt med, at de bliver slidt. Og den eneste grund til at kassere pistolen, var at slør mellem slæde og ramme bliver for stort og i en pistol som Neuhausen, med fuld slædeføring, kan det jo tage evigheder.

Ergonomien er god. Selv har jeg ret små hænder, men pistolen virker til at have smallere greb end f.eks. USP’en. Har man store eller meget små hænder, kan man skifte rammen til en anden størrelse.

Vinklen på grebet føles til, at være et sted tæt på en 1911, hvilket også var tydeligt når jeg lavede træk fra hylster. For mit vedkommende betød det at mit “natural point of aim” med X-Carry lignede det jeg kender fra mine egne pistoler. Men har man skudt Glock fra den dag man lærte at spise med ske, så vil man nok opleve at sigte lidt lavt i målet under sit træk.

Grebet er monteret med griptape, som man kender fra de dynamiske skydediscipliner. Grovheden svarer vel til det man ville kalde for korn 120 sandpapir. Men personligt bruger jeg korn 60. Jeg kan godt lide den lidt mere aggressive overflade, men det er nu bare smag og behag hvis man ellers kan finde ud af at holde hårdt nok greb på pistolen.

Øverst på grebet har man udeladt en smule griptape til fordel for et SIG logo, hvilket måske ikke er helt gennemtænkt, da det er her svag hånd kan hjælpe mest med den kødfulde del af håndfladen, specielt når man fra SIG SAUER har været så betænksomme at lave undercut ved aftrækkerbøjlen. Generelt ville jeg nok foretrække panelerne til griptape var større. Men jeg vil tro, at vi med X-Carry har fået en bedre løsning med grebet end amerikanerne har på deres M18.

Det sidste jeg lige vil nævne med grebet er, at vi har fået en magasinbrønd på vores pistoler, hvilket faktisk ikke er standard på den civile udgave af X-Carry. Udover at være en kæmpe hjælp til hastige magasinskifte, vil det måske også komme dem tilgode der har nogle meget store hænder. Der følger 3 stk 21 skuds magasiner med til sættet.

Slæden har udskæringer både for og bag, men de instruktører der var tilstede til omskolingen, anbefalede at man brugte et power stroke greb på den bagerste del af slæden, altså et overhåndsgreb, så svag hånds tommelfinger peger mod skytten.

Personligt har jeg aldrig været fan af den type ladegreb, og jeg valgte da også hovedsageligt at bruge fronten af slæden .

Den civile udgave af X-Carry har en udskæring i toppen af slæden, men ikke den udgave Forsvaret får. Her er der istedet indgraveret “FMI”. Hvis jeg havde pistolen udleveret, ville jeg ikke udelukke at der blev monteret griptape på fronten af slæden, fra den ene side, henover FMI logoet og om på den anden side. Våde eller blodige hænder kan have svært ved at få et ordenligt hold om slæden, selv ved brug af et power stroke greb. Pistolen er jo ikke den største der findes, og krydrer man det hele med lidt koldt vejr, så tror jeg lidt griptape er givet godt ud. 

Jeg vil lige hurtig kaste en kommentar om sigtemidlerne, inden vi kommer til snakken og aftræk, rekyl osv.

Det forreste sigte er fra Truglo og med en grøn ring, samt tritium. Den grønne ring er ret iøjefaldende, og virker faktisk meget godt til de hurtige skud på kort afstand hvor man har et “target focus”. Til gengæld er det meget bredt, og jeg tror det var årsagen til at mine splittider var ret langsomme på afstande over 18 m. Der er lys på begge sider mellem korn og kærv i en normal skydestilling, men med et så bredt et sigte, skal man alligevel koncentrerer sig, specielt når en stor det af målet er gemtbag det forreste sigte.

Det bagerste er placeret på en plade der lukker af for den udfræsning der er til et optisk sigte. De er ikke justerbare. Det er kun SIGs eget Romeo 1 sigte der passer i udfræsningen, så hvis man senere vil købe optik til pistolen, så er man lidt stavnsbundet der. Ved mindre man laver en eller anden adapterplade mellem slæde og optik. (Admin note: Er blevet gjort opmærksom på at slæden er skåret til at passe Leupold Delta Point Pro, hvilket gør at den passer til både DPP og R1 rødpunktsigterne uden brug af adapter plader, hvilket ingen af de andre pistoler i testen gjorde)

Et af kravene til den nye pistol var at det skulle være med striker fired aftræk, og ikke et single action aftræk som vi kender det fra Neuhausen eller et single action/double action som på USP.

Og lad mig starte med at sige, at det aftræk som X-Carry har, er uden sammenligning det bedste aftræk jeg har prøvet på en striker fired pistol. Den har langt fra det samme vandpistol-agtige aftræk som Glock, og overgangen fra det bløde aftræk er let at finde, og praktisk talt uden nogen form for creep. Det ville være synd at sige, at aftrækket er som en nål af glas der knækker. Men jeg har prøvet flere single action aftræk der var tungere, og med mere creep, end aftrækket på X-Carry. Jeg havde håbet på et kortere reset, og da jeg primært skyder i civil regi med et 1911 single action aftræk, havde jeg et par uheldige opfølgende skud. De langsomme skud har uden tvivl lignet et trigger freeze, men det var nu bare beviset på at et rigtig godt aftræk kan lulle dig over i en selvtilfreds zone, som du lynhurtig kommer ud af, når du skal vise, hvad du kan med en anden type pistol.

Kernelinien er højere placeret end Glock, men jeg føler ikke rigtig at det overhovedet er mærkbart under rekylet. Slædens lette vægt er sikkert med til at modvirke det vrid en høj slæde ellers kan forudsage. Specielt ved skydning kun med stærk hånd, blev min forventning om et kraftigt rekyl ikke indfriet. Jeg har længe ikke haft oplevelsen af et rekyl, der var så hurtigt at vænne sig til.

Hylster, bælte og magasinholdere fortjener også lige at blive nævnt. Det meste er fra Safariland, på nær en dobbelt magasin lomme til TYR, men som er fra Protech.

Hylsteret er med SLS og ALS sikring, men forbavsende nemt at anvende. Hylsteret er monteret i Safarilands QLS system, og der følger også både molleadapter samt bælteadapter i tre længder med i pistolsættet.

I sættet finder man også et ELS bælte. Men ingen af adapterne eller magasintaskerne er til ELS systemet. Men kunne forstå at det er hensigten at anskaffe andre magasintasker der passer til ELS. Derudover kan MP’er og vagtpersonel montere Safarilands tasker til peberspray, håndjern osv. via ELS systemet. Til bæltet er der også et inderbælte, og det kunne godt bruge en forbedring. Inderbæltet har ingen spænder, og den eneste måde man kan stramme bæltet er via velcro.

Jeg bruger selv Safarilands ELS bælte til mit konkurrenceskydning, men har valgt et andet inderbælte hvor bæltets ene ende føres igennem en spænde før man anvender velcro. På den måde kan man spænde bæltet ind. Personligt vil jeg nok begynde at kigge efter et meget tyndt bælte med hun-velcro på ydersiden og et lille cobraspænde. 

Var alt den hype så på sin plads?

Jeg sidder i hvertfald tilbage med følelsen af, at Forsvaret har fået den bedste pistol der kunne købes. Pistolen er måske ikke perfekt, men det er betragtet ud fra hovedsageligt personlige preferencer. Men skulle en af de andre kandidater have været bedre en X-Carry, så må de sgu være et “wunder-waffe”.

Om skribenten: Han er tjenestegørende soldat og en ganske habil pistolskytte i civilt regi, hvilket et dansk mesterskab i IPSC vidner om.

Orion Defence NVG Counterweight Pouch til Cobra Hjelm M/12

Alle, som har gået med Natbriller (NVG) i bare kort tid, vil nikke genkendende til at hjelmen ikke er i balance. Jeg har hundredevis,  hvis ikke langt over tusind timer med NVG på hovedet og der har bare aldrig været en ordentlig montage/facemask system udleveret til os dødelige, som gjorde det tåleligt. Med PVS-7 facemask, fik man ømme kæber og trykpunkter på panden. Med hjelmmontagen på en Hjelm M/96 var det helt umuligt at holde den i samme position foran øjnene hele tiden.

(Eneste grund til jeg ser nogenlunde happy ud, er at jeg har taget PVS-7 af facemask)


Med PVS-14 og Cobra Hjelmen betyder det, at man får ondt i hovedet, som regel et sted på panden pga. tryksteder, når man forsøger at stabilisere hjelmen via det indbyggede justerings system. For mig tog det ca. 10-15 minutter, før det begyndte at blive ubehageligt og så er en hel nat altså lang, når man har NVG på hele tiden.

For at undgå dette, er man nødt til først at bringe sin hjelm i balance. Dette gør man, ved at montere en modvægt bagpå hjelmen.

Der har været flere udenlandske producenter, som har lavet tasker til modvægte, så man kan bringe balance på hjelmen. De fleste af dem har indeholdt mindre fordelings rum til AA, AAA og CR123 batterier og evt en MS2000 strobelygte eller haft bly eller andet tungt metal, i en eller anden udformning.

Hvis man vil gå seriøst til værks med, at balancere sin hjelm, skal man først se på hvad vægten, man smider på foran hjelmen, altså NVG med batteri isat og montagen, vejer.

På min køkkenvægt vejer en Natbrille (PVS-14) med batteri og montagen: 554 gram.

Det vil sige, for at bringe balance på hjelmen, når NVG er monteret, så skal der være en tilsvarende modvægt monteret bagpå. Ideelt set nøjagtigt samme vægt som foran.

Nu er blyvægt ikke særligt smart at gå rundt med. Selvom det nok, rent størrelses mæssigt, er den fladeste løsning. Så det skal helst være noget, som i forvejen er en del af ens udrustning, som man alligevel skal have med, så man ikke render rundt med død vægt.

Orion Defence har tidligere leveret nogle NVG modvægts tasker specielt til nogle “Luftwaffe” gutter, som specifikt blandt andet skulle have plads til en MS2000 strobelygte, så Orion Defence har erfaring i at finde gode løsninger tilpasset specifikke opgaver.

Orion Defence har nu lavet en modvægts taske kaldet Counterweight, Cobra M/12, som passer på den udleverede Revision Cobra M/12 hjelm og den er den bedste udgave af en modvægts taske, jeg har oplevet endnu.

Den er beregnet til at tage et PRC-152 batteri og et knæklys forneden. Således at den spiller fint sammen med den udleverede udrustning og standarder for IFF.

Et 152 batteri vejer 377g.

Tasken fra Orion Defence vejer i sig selv 39g og med et IR knæklys monteret 59g.

Hvis man så regner det ud, ligger man på en modvægt bagpå på 436g.

En difference på 118 g. Dette er nok tæt nok på til, at balancere hjelmen nogenlunde stabilt. Hvis ikke, kan man tilpasse vægten bagpå ved at velcro nogle AA,AAA eller CR123 batterier på velcroet på tasken over selve lommen.


Montering:

Jeg monterede tasken, ved at tage den bagerste skumpude dims i nakken, ud af hjelmen og føre de to one-wrap velcro stropper ind i hjelmen og så montere skumpuden igen. Jeg var påpasselig med at sætte den korrekt, således, at de to elastiske stumper stykker til knæklys sad korrekt ved kanten af hjelmen.

Derefter flipper man tasken op og monterer den på velcro stykket på bagsiden af hjelmen. Eller man kan også gøre det omvendt, altså placere tasken udenpå først, men dette var fremgangs måden, jeg brugte.

Tasken er forsynet med velcro udenpå, både på flappen, som den fastgøres med og på selve låget på tasken. Her kan man så montere andre ting, som IR-reflektorer strobelygte eller lign. Orion Defence har lagt et IR-reflekterende firma logo mærkat med i indpakningen, hvilket er en fin gestus. Orion Defence er også leverings dygtige i andre IR-reflektor mærkater, så som national flag, enheds markering osv. som jeg også har benyttet i nogle år.

I praksis:

Da jeg ikke har adgang til et 152 batteri, så har jeg testet tasken, med perfekt balance, ved hjælp af en blyvægt i den.

Jeg gik en tur en nat, på et par timer med hjelmen og NVG og Orion’s modvægts taske, med en samlet (Taske+bly) afstemt vægt på 550 gram og oplevede ikke nogen problemer med trykpunkter eller hovedpine. Det var selvfølgeligt stadigt trælst, at gå med hjelmen og især en så tung hjelm, med NVG og modvægt, men i det mindste, fik jeg ikke hovedpine af vægten og NVG forblev i position foran mit øje, uden, at jeg skulle justere på hjelmen flere gange under turen. Under de mørke øvelser jeg deltog i efterfølgende på Bykamp kurset, havde jeg heller ingen problemer.

Summa Sumarum:

Hvis du går med natbrille og er træt af at få ondt i hovedet og justere på din hjelm hele tiden, så burde du nok tage et seriøst kig på Orion Defence’s Counterweight, Cobra M/12 taske. Jeg går ihvertfald ikke med NVG uden den fremover.

110% Tactical.dk godkendt


Kontakt Orion Defence på Facebook her: https://www.facebook.com/oriondefence.eu/

Orion Defence TYR M/12 opgradering Del 2

Orion Defence producerer også tasker, som kan bruges i forbindelse med TYR M/12 platecarrieren eller Brokos bæltet.

Den mest interessante, er det elastiske 3 magasin panel, som er designet til at erstatte det, som sidder på TYR M/12’s front.

I modsætning til f.eks Blueforce Gear’s TENSPEED 3 magasin taske, så er Orion Defence’s panel designet til at passe i de 3 slidser, hvor front panelet er fastgjort på TYR.

Panelet holder, som TYR’s panel, 3 stk 5.56 magasiner og intet andet.

Der er ingen sikkerhedsstropper over toppen af magasinerne, som på TYR’s panel, da dette ikke behøves fra et fastholdelses synspunkt. Panelets ydre materiale er primært elastisk stof, kombineret med en inderside, hvor der er et stykke materiale med non-slip, som gør, at de ikke falder ud af tasken, selvom man står på hovedet.

Under taskerne er der en flap med 3 huller, hvilket er med til at give bedre greb med fingrene, hvis man skal have panelet rykket op for at komme ind og ud af platecarrieren.

Fronten af tasken er forstærket med noget cordura laminat, som også har laser skårede slidser, så man kan montere PALS/Molle kompatible tasker eller et lignende panel udenpå. Disser stikker et stykke op over kanten på elastikstoffet og giver hermed mulighed for hurtigere og nemmere at få isat et magasin i tasken, i forhold til en BFG TENSPEED taske, som kan være ret enerverende at rode rundt med, specielt hvis man forsøger kun at benytte en hånd til det.

Personligt ser jeg ingen grund til, at man skal monterere flere magasiner udenpå panelet, men det er godt med muligheder, sålænge det ikke vejer mere og det gør laser skårede slidser i forstærkningerne ikke, i forhold til webbing remme syet udenpå en taske. Men måske i lige din funktion, passer det ind.

Fordelen ved at skifte TYR panelet ud med Orion Defence’s er:

  • Mere strømlinet profil, som hjælper, når man skal igennem trange åbninger, eller over en mur.
  • Hurtigere magasinskift fra platecarrieren, da man ikke skal rode med sikringsstropper.
  • Mindre bevægelse af udrustningen under løb, hvilket medfører mindre træthed.

Det lyder vist lidt perniffent, at sige sådan noget, vil nogen måske syntes, men taskers bevægelse, som ikke er i synkron med kroppen, modvirker bevægelsen og den energi man udøver og gør folk trætte hurtigere, end hvis det sad fast.

Der var en grund til, at vi på M/96 basis systemet brugte webbing stropper og elastikker til at forhindre taskerne i at hoppe rundt på må og få, når vi gik og løb med det. M/96 ABC maske tasken er et prima eksempel, hvor man benytter de elastiske barduner fra rastudstyret til at stoppe tasken med at floppe rundt.

Hvis det var muligt, var alle mine tasker på TYR og Brokos bæltet lavet af elastisk stof materiale. Der er en grund til, at jeg har flere Blueforce Gear TENSPEED tasker monteret på den. De vejer minimalt og hvis de ikke lige benyttes (Til chokgranater, kop ladninger eller andet ekstra udstyr, man får smidt i nakken til en opgave) ligger de flade og fylder ikke.

Den første og største ulempe ved Orion Defence’s panelets nuværende design er, at panelet ikke er lukket i bunden, så der kan komme sand, skidt og møg ind i magasin åbningerne. Jeg har belyst emnet for Orion Defence, allerede da jeg fik panelet og vi havde en snak om det. Holdningen er, at det nok ikke er primært fokuseret på en infanterists opgave, som involverer en del roden rundt på maven på jorden. Men mere tiltænkt SOF aktioner og eskorte opgaver, sikring fra lugerne på køretøjer, opsiddet i køretøjer og afsiddet til fods rundt omkring som Guardian Angels f.eks. Den mere strømlignede profil af panelet, vil helt sikkert være en hjælp der.

Den anden ulempe er, at en taske med elastisk stof, ikke er lige så holdbar i længden, som en taske lavet af cordura. Sådan er det nu engang, vægt reduktion og strømlignethed er ikke kompatibelt med ultra lang holdbarhed med de materialer, som er på markedet nu. Orion Defence har forsøgt at minimere dette slid, ved at lave de forstærkninger med laminat på fronten af panelet.


For nu at tale om vægt.

Jeg tror, at der kunne skæres endnu mere vægt af tasken ved at fjerne det non-slip panel indeni, da jeg vil tro at selve elastikstoffet er nok til at fastholde magasinerne. Eller i det mindste minimere non-slip stykket med 70%, så det bare holder på en del af magasinerne. Bare en ide jeg har.

TYR panelet vejer 138g

Orion panelet vejer 120g

Til sammenligning vejer en Blueforce Gear TENSPEED 3 mag taske 87g.

Jeg er sikker på, at der er noget vægt at hente på det Orion panel.

For lige at nørde vægt lidt mere, så regnede jeg lige lidt på det, som et samlet system.

Orion Defence cumberbund med quick release og 3 mag frontpanel giver samlet en vægttab på 18g i forhold til TYR’s løsning med frontpanel og cumberbund, uden softarmor holderen. Så udover at Orion’s løsning er mere strømlignet, hurtigere at få på og specielt af i en nødsituation, enhåndsbetjent, så er det også lettere samlet. Win Win!


Rumfang/strømlignethed af TYR med div paneler monteret:

Som det første vil jeg sige, at jeg syntes, at dobbelt stacke magasiner på fronten er en dårlig ide. Hvis man med sin udrustning ikke kan komme over en 2 meter væg eller igennem nogle trange åbninger, så skal man revurdere sin opsætning. Det er alt andet lige nemmere at komme over en væg, med kun et lag af 3 magasiner på fronten end 2×3 magasiner. Og liggende skydestilling er noget lavere og behagelig med kun et lag af magasiner.

Så alle jer som dobbelstacker magasiner på fronten af TYR, stop det nu. Bær de ekstra magasiner i bæltet istedetfor, hoften er også et bedre sted rent fysiologisk at bære vægt.

TYR panelet med 3 stk 5.56mm alu magasiner monteret, stikker ca.8 cm ud fra kroppen.

Orion Defence panelet med 3 stk 5.56mm alu magasiner monteret stikker ca. 7 cm ud fra kroppen. (Billederne snyder lidt pga kameraets placering på min mobil og jeg ikke fangede den rette vinkel)

Bemærk, at der kun er softarmor pakker i vesten og ingen riffel beskyttelses plader isat. Når de kommer i, stikker udrustningen selvfølgeligt endnu mere ud fra kroppen, hvilket gør Orion Defence panelet endnu mere aktuelt for enkeltmand.


Når elastisk tasker er tomme ligger de fladt.

Bemærk forskellen.


Summa Sumarum:

Jeg er egentligt ganske tilfreds med frontpanelet, men ville gerne se, at der laves en lukket bund løsning i fremtiden, så man undgår sand og møg i sine magasiner, hvis man roder rundt på navlen på jorden. Men hvis ens primære opgave ikke er at rode rundt på navlen, så er den lige hvad man har brug for. Kombineret med cumberbunden fra Orion Defence er det en værdig opgradering.


99% Tactical.dk godkendt 😉

Kontakt Orion Defence på deres Facebook side: https://www.facebook.com/oriondefence.eu/


Orion Defence TYR M/12 opgradering Del 1

Jeg har haft lidt tid i TYR M/12 platecarrieren nu og har leget lidt med opsætning og forbedringer til den. Jeg har, i sidste uge, brugt hele ugen i bykamp med nogle ting fra Orion Defence, som gør livet lidt mere tålelig i den.

For lige at sætte det værst tænkelige scenarie op, så forestil jer, at i sidder i et pansret køretøj, som ender i en vandingskanal i f.eks. Irak, Afghanistan eller Rendbjerg Rende.

Eller falder i vandet under en boarding i rum sø.

Eller er med i en helikopter, som flyver over vand og styrter ned og vandet vælter ind i kabinen og i hænger fast, i et eller andet og er nødt til at dumpe jeres udrustning i en fart, for ikke at drukne. Her kan sekunder betyde forskellen imellem at komme ud eller drukne.

Eller man sidder fast i et køretøj, som er i brand pga en IED eksplosion.

Så forestil jer, at i kun kan bruge en hånd, fordi den anden arm er brækket…

Det er ganske plausible scenarier, som jeg har set tidligere i Irak.

Disse scenarier var grunden til at jeg, i Irak, valgte en vest med quickrelease, så hvis man endte i sådan en situation, så kunne man i det mindste droppe sin udrustning ved at trække i en udløser med en hånd og måske redde sig ud.

Det ville være totalt nederen, at have overlevet en masse vilde krigsting, for at drukne eller brænde op i en ulykke, ikke?


TYR M/12 er grundlæggende et meget godt system, det er 1000 gange bedre end det vi havde, før det blev indført, men der er flere ting, som jeg personligt finder lidt irriterende.

Et af punkterne er, at man skal løfte magasin flappen på fronten op, for at tage TYR M/12 af og på, samt, at man altid lige skal justere velcroen igen, fordi man ikke lige får den placeret ens hver gang. Og det er en to hånds operation hver gang.

Det problem har Orion Defence løst ved at lave en cumberbunds opgradering med et plastik spænde system, kaldet ROC80 fra 2M i Italien. Så den altid har samme justering og er hurtig at tage på og af uden at skulle rode med magasin flappen. Og kan udløses og tages af med brug af kun en hånd.

Nu har jeg vejet og sammenlignet den imod TYR cumberbunden, da alle som følger siden her ved, at jeg går meget op i vægten på udrustning. Noget som generelt bør bringes ned.

Til sammenligning af de to cumberbunds er der nogle ting, man skal have med i overvejelserne:

  1. Lethed af betjening, altså komme ind og ud af.
  2. Bærekapacitet, altså rækker af PALS/Molle til montering af andre tasker uden på cumberbunden. TYR M/12 har nogle stykker som velcro’es på selve cumberbunden, som er monteret med PALS/Molle webbing. Orion Defence har laserskårede rækker i selve cumberbunden med samme antal rækker som på TYR M/12.
  3. Skal man have softarmor pakken med?

Vi vender tilbage til dette senere.

TYR Cumberbund, komplet (Minus selve softarmor pakken) til en L/XL platecarrier vejer 249g.

Orion Defence cumberbund i sig selv vejer 154g og der er hermed en vægt besparelse på 95g på hver side, hvis man ikke skal have softarmor pakken i.

Skal man have softarmor pakken , så skal man have vægten til holderen til den lagt oven i. Den vejer 110g.

Så Orions cumberbund med softarmor holderen, kommer op på 258g, en forøgelse af 9 gram på hver side.

De, 18 g totalt, er ikke nok til at mit vægt OCD begynder at råbe og skrige til mig, når jeg slipper for at skulle rode med magasin flappen foran, fordelene opvejer LANGT de 18 grams vægt forøgelse.

MEN hvis man nu ikke skal have softarmor pakken i, men stadigt har tasker man skal have monteret på sin cumberbund, så er der en væsentlig forskel og vægt tab, ved at montere Orion Defence’s cumberbund, fordi der er samme antal rækker PALS/Molle at montere tasker på, som på TYR’s. Men på TYR’s er man er nødt til at bibeholde lommen til softarmor pakken for at montere tasker. Her snakker vi altså om en samlet vægt forringelse på 190g. Det er værd at tage med.

Men sådan går det jo nok ikke, fordi nogle syntes man skal have det hele på, hele tiden, så det ender med en samlet vægt forøgelse på 18g, men man har så også et meget mere sikkert og letbetjent system, at arbejde med og det tæller rigtigt rigtigt meget.

Rent betjenings mæssigt er Orion Defence’s cumberbund hurtig og let at få af og på. Man trækker bare i det stykke faldskærmsline, som er monteret på spændet og rykker ud og op i den, så går den fra hinanden og platecarrieren kan tages af.

Efter en uge med bykamp er der ikke noget, som er gået i stykker eller viser tegn på dårlig konstruktion. Jeg kender ikke til noget med arktiske forhold og kuldens evt. indvirkning på, om spændet enten sprænger eller knækker, så der må jeg sige at det ved jeg intet om.

Spændet er ikke gået op af sig selv på noget tidspunkt, som var en mistanke jeg havde, at det måske kunne gøre. Jeg har ihvertfald ikke oplevet det endnu og jeg har kravlet og klatret rundt i Brikby med den på.

Summa Sumarum:

Dette er ikke bare en Gucci grejluder lækkerheds ting, men, i min optik, en essentiel opgradering, som gør TYR M/12 mere brugervenlig og vigtigst af alt, mere sikker, hvis man skal ud af sin udrustning i en fart, for ikke at dø.

110% Tactical.dk godkendt og anbefalet. (Hvis det altså betyder noget for jer)


Kontakt Orion Defence på deres Facebook side: https://www.facebook.com/oriondefence.eu/


Ny Uniforms Bestemmelser for Hæren udgivet

😈

Hærchefsergenten har i dag lagt et link til den nye UBH op på Facebook

Link til UBH2018

Kommentar: Ja….. Det er jo målbart 🙄

Tilføjelse:

MHT støvler, så har Hærchefsergenten på Facebook sagt, da der blev spurgt til det, at det kun er udleverede støvler fremover, da folk løber rundt i felten i noget, som minder om løbesko, hvilket ikke er hensigtsmæssigt og da der efterhånden er 10 modeller udleveret, burde det være muligt at finde noget som virker.